
Turtle Beach Ear Force P11 Speakers Replacement

Introduction
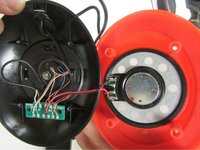
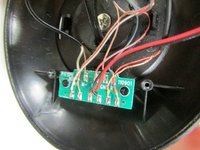
Go to step 1The Turtle Beach P11 headset is equipped with two 50 mm diameter speakers with a frequency response between 20 Hz to 20 kHz which is same as the audible frequency range of the human ear. They have a bass boost fixed at +6 dB range at 50 Hz. There could be problems with the speaker such as inaudibility, crackling voice, distorted sounds etc. which cannot be fixed by suggested technical methods and thus require replacement of the speakers.
What you need


To reassemble your device, follow these instructions in reverse order.
To reassemble your device, follow these instructions in reverse order.
Cancel: I did not complete this guide.
4 other people completed this guide.

Team

IUPUI, Team 1-2, Wilson Fall 2015 Member of IUPUI, Team 1-2, Wilson Fall 2015
IUPUI-WILSON-F15S1G2
2 Members
6 Guides authored
6 Comments
I am sorry jtrent238 , but i can further guide you on how you could solve the problem
Do you know where I can get the speakers from?
my problem exist in this area https://imgur.com/grLwOkt cant figure out how to detach the entire bud to get access to the internal wires
My problem is I don't know which wire with which one to solder. Can you help me?