
Wii U GamePad Outer Case Replacement
Introduction
Go to step 1This guide will help you to remove the outer case and be able to open the Nintendo Wii U Gamepad. You will need a Tri-point Y1 screw driver.
What you need


-
-
Place Gamepad face down and remove the two 4.7 mm screws with a Phillips size #00 screwdriver.
-
-
-
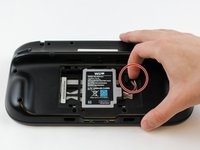
With your finger, press down and pull back on the battery connector plug.
-
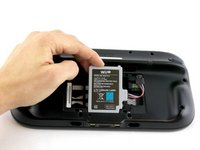
Remove the battery from the battery case.
-
-
-
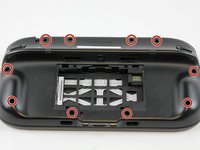
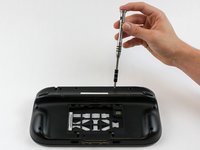
Remove 10 9mm screws with Tri-Wing size Y1 screwdriver around the outer case.
-
Lift up on the back of case.
-
-
-
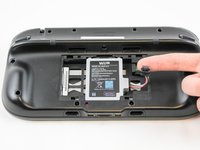
Unplug outer case rumble motor connector from the motherboard with your fingers.
I agree. A circle over the plug would have been better as the picture looks like you just pull on the wires lol.
Chris -
Thanks for the comment. I did get a set of tweezers and the negative cable broke anyway. They really could have done a better job at using a different connector for that.
Why in the world is this thing so tightly connected?
Thanks for the comment. I did get a set of tweezers to try to pull it out but still ended up breaking the negative cable. They really could have used a better set of cables and connectors for this.
You don’t have to do this step!!!! Just open the switch while keeping this wire intact!!!!!
-


To reassemble your device, follow these instructions in reverse order.
To reassemble your device, follow these instructions in reverse order.
Cancel: I did not complete this guide.
5 other people completed this guide.
Team

USF Tampa, Team 1-6, Sullivan Spring 2016 Member of USF Tampa, Team 1-6, Sullivan Spring 2016
USFT-SULLIVAN-S16S1G6
4 Members
40 Guides authored
2 Comments
This doesn't show anything about taking the front of the housing off, is that relatively straightforward?
This doesn't show anything about the L and R sticks like moving on its own when i play, do you how to fix that?
tried to unscrew the 10 Tri-Wing size Y1 screw with my iFixIt toolkit
unfortunately the tool is too “fat” and short, it cannot reach 4 screws on the corners of the gamepad.
having the iFixIt toolkit and needing to purchase an additional slim screwdriver it’s a shame…
Antonello Iannone - Reply