Introduction
Use this guide to replace your iPod Touch's battery. Replacing the battery requires a soldering iron and knowledge of surface mount soldering.
Before you start, first back up your iPod by sync-ing it with iTunes. It may come back up in a state where it needs resetting and restoring.
What you need
-
-
The picture at left (front panel already removed) shows the locations of the metal clips (shown in red) that snap on to the plastic frame. In the next few steps, try to pry the front panel up from the gaps between these clips.
-
-
-
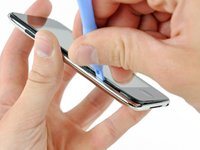
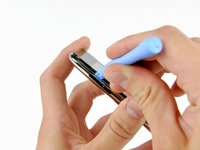
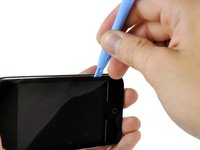
Gently insert an iPod opening tool between the glass front panel and its plastic surround near the volume adjust buttons.
-
Rotate the tool away from the Touch to pry up on the glass panel.
This is a poor place to start. You risk damaging the volume control. It makes more sense to start at the bottom, at the Home button, where there is plenty of room and nothing to damage.
-
-
-
Use the flat end of a spudger (or an opening tool) to very carefully pry the touch screen cable connector up off the upper logic board.
I had a real challenge getting the ribbon cable connected; after 20 minutes of trying while carefully balancing the front panel and trying not to rip the ribbon, I grabbed the old screen, ripped off the connector and practiced getting it on.
I had another challenge of the connector staying on...I had noticed a little piece of rubber had come off when I took the old screen off. That piece of rubber was EXACTLY the same size as the connector; I'd guess it is meant to hold the connector in place when the panel is put back on...So, I put it on top of the connector and closed it up..
Perfect!
Cheers, Rob
This was where I messed up, the adhesive on the digitizer was weak and when I tried to remove the original the bracket stayed in place, I figured that as I was installing the replacement and as I tried to put it into place and it wouldn't go I apparently jerked and broke the ribbon cable on the replacement there went my money now I have a faceless unusable iPod until I can order another, I did replace the LCD with little trouble though, not a completely failed repair.
-
-
-
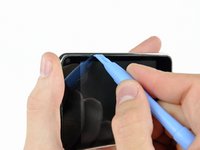
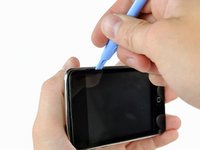
Insert a small iPod opening tool with the edge angled up toward the underside of the display between the white plastic backlight and the metal shield beneath it.
-
Pry up along the lower edge of the display enough to grab it with your fingers, being careful to not flex the screen.
-
-
-
-
Use the flat end of a spudger to pry the battery off the adhesive securing it to the metal display tray.
-
Remove the metal display tray and set it aside.
-
-
-
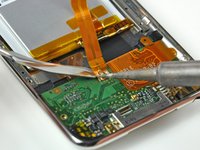
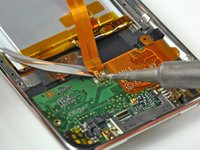
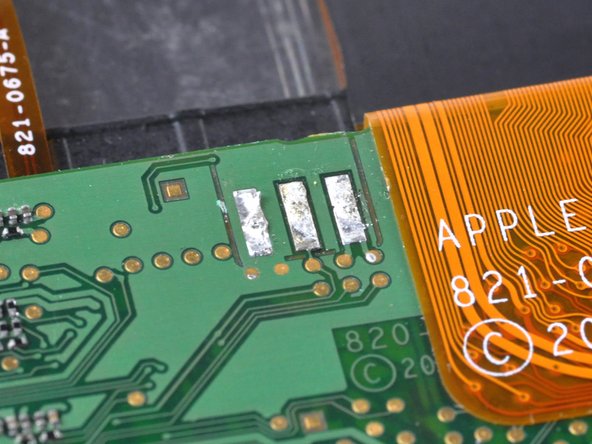
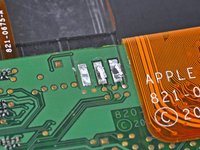
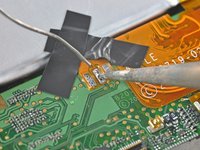
Start working from one side of the battery ribbon cable. In our case, we started on the left. Heat the leftmost solder pad while gently prying up from under the ribbon cable to free it from the board. Repeat this process for each of the two remaining pads, working either right to left or left to right.
-
-
-
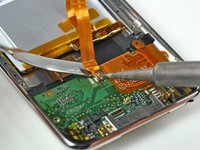
Next, use the tip of a soldering iron to flatten out the solder on the logic board solder pads. The pictures show a 'before' and 'after' shot.
The center battery connector is more fragile, it does not go thru the board and came off. I was able to connect it to the spot just above and it seems to work.
Other than that I did have trouble with the clips on the right side and damaged the rubber a bit, but it is servicable. The technique and angle for uncliping is still not clear but probably hard to explain - it is a skill.
However, thanks for the best instructions I could find!
Step 21
It seems the connectors are very fragile! I had to glue the left one back and connect it to the round contacts on the logic board with a tyni wire (solding). Be very careful to put enough heat on the solder pads before levering the connector cable off (but do not overheat)
-
-
-
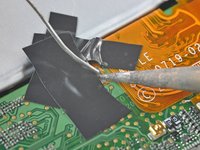
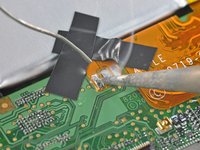
Place your battery in the rear panel, with the cable side down, and use two small strips of electrical tape to hold the cable against the solder pads.
-
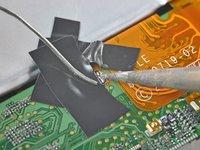
Place a strip of tape over the end of the battery ribbon cable to both cover two of the solder pads and hold the contacts down against the logic board.
-
Heat the rightmost contact until the solder below melts and apply a small amount of solder to the contact, allowing it to flow through the two holes in the cable and down to the logic board.
-
As soon as the solder has flowed into the joint, remove both the solder and the iron.
-
-
-
Remove the piece of tape covering the remaining two leads. If you are satisfied with the position of the cable relative to the pads on the board, proceed. If not, de-solder the first connection and try again.
-
Solder the two remaining pads to the logic board, being mindful of overheating the cable or board.
-


To reassemble your device, follow these instructions in reverse order. Don't forget to clean both the display and the inside of the screen before final reassembly. You can use spectacle cleaning spray and a lint-free cloth for this. Clean the screen horizontally and the display vertically, and have a test look. The direction will tell you where the smudges are.
To reassemble your device, follow these instructions in reverse order. Don't forget to clean both the display and the inside of the screen before final reassembly. You can use spectacle cleaning spray and a lint-free cloth for this. Clean the screen horizontally and the display vertically, and have a test look. The direction will tell you where the smudges are.
Cancel: I did not complete this guide.
103 other people completed this guide.

20 Comments
They can be found here in our store.
I've done the battery change and went through the whole process without too much hassle. Once it was done, I turned my iPod on and it worked. However, when I came to charge it, it just wouldn't work (the battery won't charge at all). So my iPod just depleted itself till the new battery went empty, and now it just won't boot anymore. I think I've done the job pretty well (or at least the iPod worked for a little while after the battery change) so I don't know what's the real reason for this not to work. Now my iPod is stuck on this screen http://km.support.apple.com/library/APPL.... Sucks to be me.
at least u didnt fix it, boot it so it worked, then assemble it and have it broken.
Appreciate it's probably way too late for yourself, but wanted to comment here in case anyone else is in this situation and stumbled across this thread.
Don't give up here if the battery won't charge, it may still be fixable! It was for me!
I Replaced the battery, everything appeared to work fine, so I reassembled only to find that the battery would not charge. The icon came up saying that it was charging, but slowly the charge ran out until I was stuck at that same screen.
Was about to sell it on for spares when I thought I'd have one last go... It turned out that the problem was not with the replacement battery itself, but the protection circuitry attached to the battery. I was able to remove the circuit (plus ribbon cable) from the original (dud) battery, and solder it onto the new one (as always being carful not to short it out in the process. Once reattached, it worked perectly!
Can only suspect it's an issue with the non-OEM circuit being faulty, or detected and blocked by apple somehow...
- Rubber ring damaged? Check!
- Dirt inside the screen? Check!
- Blue plastic tools busted? Check!
- Battery replaced? Check!
- Unit working? Check!
I recommend having blue nitrile gloves on your hands to minimize grease transfer.
I'd also recommend enhancing the instructions on how to release the side catches with more technique photos. That was the hardest part for me.
Job complete. Check!
-tools broken? Check!
-able to proceed? Nope!
Brandon -
People u need a metal tool to easily remove the front glass a plastic spudger won't do it very well as it needs to be flat and pushed in between the clips and the metal retainers and gently lifted. Also if you must use tape to hold the battery ribbon cable down use heat resistant tape made for the job because if you melt the tape it will mix with the solder and contaminate it. Use IPA and a lint free cloth to wipe down the screen right before replacing the front. The correct way to prep the contacts before soldering is to use solder wick to remove any old solder that remains. Also be carefull of static. If you have trouble getting digitiser cable to fit back on the board and you are getting annoyed walk away for a few mins and clear your head I bet it'll go on first time when you got back to it.
One last thing warm the plate with a hair dryer to get the old battery off it will soften the glue make things much much easier and you don't risk bending the battery and causing yourself disaster.
I installed the battery, and double checked one of the battery connectors before closing it up. Once I got it all together, I plugged it in and it showed the REALLY low red battery with the lightning logo. So I waited, and read a couple comments, and people were turning on their iPods right away, but mine wouldn't give me anything but the REALLY low battery. I started to get worried, and looked up a couple other answers. After about 5 minutes, the silver Apple logo popped up and I was relieved.
Just remember to have a little patience.
I had a problem with mine after the battery was replaced. I would turn it on and just get the sliver of red for the battery, and it would not boot. It would work fine until I pressed the LCD assembly down into the housing, and then the battery went dead. What I observed was that the LCD ribbon cable that runs under the battery to its socket was quite stuck to the back of the case when I tried to remove it. This left a bit of the insulation from the cable stuck to the back of the housing. After replacing the battery it would work fine till I pressed the LCD down, and then it would short out. So I lifted the LCD assembly again, lifted up the LCD ribbon cable and put a inch and a half piece of black tape down underneath between the cable and the housing. After reassembly it worked fine.
Also, just a tip that worked for me..instead of trying to remove the old battery with the solder tip trying hard not to short or bridge the terminals, I just snipped the old battery ribbon cable back about an inch or so from the solder joints with scissors. Then with a grip on the leftover piece of ribbon I just quickly applied the tip to all three solder joints and lifted it off easy. (I am sure this is not what is standard practice, but with the battery snipped off and out of the way, I didn't see the a problem with bridging the terminals all at once, since there was no battery voltage to worry about.) Anyway, it worked!
After I finished, had to reset the iPod to get anything to show up other than a blank white screen: press and hold power and home button at same time. After they are released, the Apple logo will show up for a minute or two. Then it should come back to life, but settings may be lost. Fortunately, I had a manual backup of the pod I had done before starting the battery replacement.
The first thing to do before any work on the hardware is to synchronize the iPod with iTunes. It may come up in a state which needs resetting and restoring from the latest backup. I agree with the comment saying more photos and better instructions are needed at steps 2-6. This is the hardest part and it is also a step where you can do serious physical damage. I also agree that a metal tool is needed for this step, although to be used very carefully. The plastic one provided is not strong enough and flexes too much in the first stage. Solder wick is definitely the answer to the desoldering step, and if you're a competent solderer with a good iron you don't need the masking tape at steps 23-4. The other hard part is reattaching the cable removed in step 8. If your big round button doesn't work on reassembly, this is why. You need tweezers, or sensitive fingers, for this step, and patience. The hints about cleaning should be given at the end, not at the beginning.
El procedimiento es correcto pero la herramienta de plastico de color azul se dobla y no tiene fuerza para separar el protector del LCD.
Lo he tenido que hacer con una herramienta de metal y sin querer he pellizcado el LCD y se ha agrietado por lo que lo tendre que cambiar la pantalla.
First time soldering and I did this and the LCD/ Screen Replacement Without any hassle I was done In an hour. The guides are a real Confidence booster.
Great guide. It almost worked for me! I think I may have shorted the new battery during installation. Apparently, the battery has a fuse in that little circuit board to which the ribbon cable is attached (can anyone confirm that a short-circuit fuse is indeed present?). Anyways, I'm thinking of wiring in a temporary external battery just to test the iPod. Can anyone tell me which battery terminal on the iPod logic board is positive and which is negative? Thanks
Having done this a few times I now disagree with step1. The thing to do is to pry *at* the clips, to release them. Not between them. Thay way you don't risk breaking other things such as the volume control, dock connector, earphone socket, etc. Just pry at each clip in turn, bend inwards to release the clip, and catch the cover edge so it doesn't slip back into position.
HELP REQUIRED
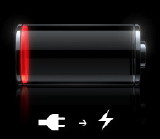
what is the true meaning of the battery symbol with a electricity bolt below it?
When you plug it in this is all that appears on the screen and then disappears again. No life at all when unplugged so I took this as a battery failure. I have replaced the battery and it still has the same problem. Any info or help would be great.
Thanks, David
Successfully completed the battery replacement. The removal of the screen was the hardest part. I damaged the gasket like so many here have. I’d like a better description of how to open the unit up without damaging the gasket “if possible”.
Get a de-soldering braid. Remover to add a little flux to the brass before. It will help to suck up the excess solder.
Also, the soldering technique makes a big difference. The smaller the solder gauge and soldering iron tip the better. Use a flux pen/marker to prepare the soldering points on the board. Also add a tiny bit of solder to the top of the ribbon cable points (again apply flux) and it should make the job easier.
Good luck.
Do be gentle when snapping your replacement front panel back on your iPod. There is potential for the Home button to be “squished” up against the internals and thus unable to be pressed in. If this happens, you must pry the panel up enough to let the Home button clear all the parts behind it and leave room to work.
Matt Rausch - Reply