Introduction
Go to step 1With Huawei pushing the frontiers of phone photography, we’ve decided to peek into the P30 Pro. By “peek,” we of course mean pull it completely apart. The P-Series appears to favor some flavor of newfangled flat camera, fluffed up with some AI-driven functionality. Let’s bring it into focus with a teardown.
Don’t lose sight of more exciting news and teardowns: follow us on Twitter, Instagram, and Facebook, or check out our newsletter.


-
-
Let's put the Huawei P30 Pro into perspective with a glance at the specs:
-
6.47" OLED display with FHD+ (2340 × 1080) resolution
-
8-core Huawei Kirin 980 Processor with dual neural-network processing units and Mali-G76 MP10 GPU
-
6 GB RAM and 128 GB onboard storage (configurable to 8 GB RAM and up to 512 GB storage)
-
Leica "quad" rear camera with 40 MP wide-angle (ƒ/1.6 with OIS) + 20 MP ultra-wide angle (ƒ/2.2) + 8 MP telephoto (ƒ/3.4 with OIS) + Huawei time-of-flight module—plus, a 32 MP selfie cam (ƒ/2.0)
-
A new earpiece speaker technology called "Acoustic Display Technology," plus an in-display fingerprint sensor
-
USB-C charging port (but no headphone jack)
-
IP68 water/dust-resistance rating
-
-
-
We pull out yesteryear's P20 Pro and put it next to Huawei's latest camera prodigy for some quick comparisons:
-
The P30 Pro (left/bottom) is 3 mm taller, 0.61 mm thicker, and a little less wide (0.5 mm) than its predecessor.
-
Despite the home button and earpiece speaker grille vanishing behind the screen, the P30 Pro has grown taller.
-
The power and volume buttons are still where they were last year.
-
Along the bottom edge of the phone we see the USB-C port remains, while the four microphone holes mirroring the speaker holes have been cut down to one to make room for the SIM card slot.
-
-
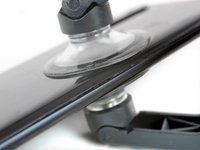
Tool used on this step:iSclack$24.99
-
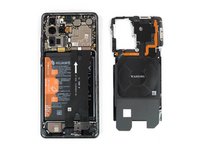
As we begin our teardown, we notice an extremely tight gap between the frame and the back glass, barely noticeable to the naked eye.
-
With a little heat, the iSclack, and an opening pick, we manage our way through the back cover adhesive.
-
Of course, the back cover is made of glass to
increase the crackability rating of the devicemake wireless charging possible.
-
-
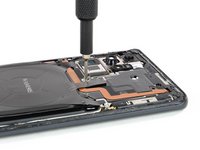
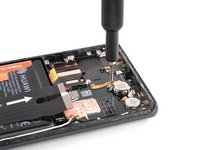
Tool used on this step:Mako Driver Kit - 64 Precision Bits$39.95
-
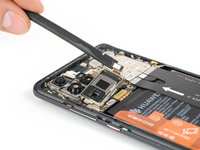
We equip ourselves with the Precision Bit Driver and a Phillips bit from our Mako Driver Set, which is (spoiler alert) the only bit we need until the end of this teardown. For that, we're pleased.
-
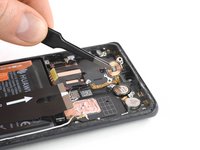
Next out is the wireless charging coil attached to the motherboard cover, which also carries some antennas and a strange orange flex cable to bridge two contacts—what for, we're not sure.
-
This charging coil not only charges the phone, but also works in reverse to charge your mouse, electrical razor, or toothbrush—no kidding.
-
It seems that for 2019, reverse charging is becoming standard equipment on flagship phones.
-
-
-
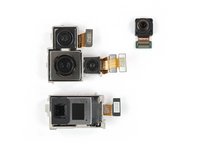
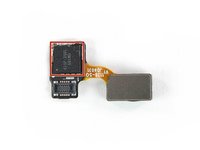
With the phone now fully open, we head straight for the cameras. First out is the new periscope-style camera module that is said to make up to 50x zoom possible.
-
But wait—it seems this module isn't used between 1x-5x zoom, coming into play beyond 5x zoom only.
-
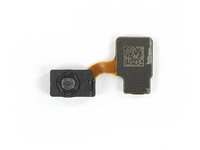
The P30 Pro has five cameras in total. Starting at top left: a 20 MP ultra-wide-angle, a 40 MP wide-angle with the Time-of-Flight camera next to it, the 8 MP telephoto (for up to 50x zoom), and of course at top right is the front-facing camera with an impressive 32 MP.
-
-
-
-
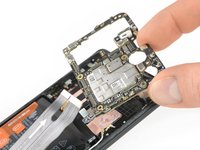
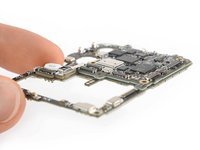
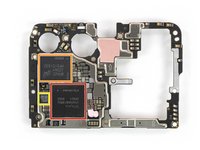
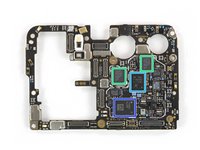
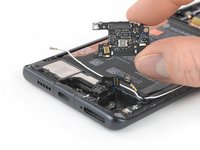
With the camera tour concluded, let's zoom and enhance this motherboard.
-
This compact piece of circuitry comes in multiple stacks. Besides having (most likely) multi-layered PCBs, this motherboard is actually two PCBs stacked on top of each other. All hail to the third dimension!
-
-
-
For further insight, we peel off the shields and seek out some chips:
-
SK hynix H9HKNNNFBMAU LPDDR4X—with the Huawei Kirin 980 layered underneath
-
Micron MTFC128GAOANAM-WT 128 GB flash storage
-
HiSilicon Hi6405 audio codec
-
HiSilicon Hi6363 RF transceiver
-
Skyworks SKY78191-11 front end module for WCDMA/LTE
-
Qorvo QM77031 front end module
-
HiSilicon Hi6H02T and Hi6H01T low noise amplifier/RF switch modules
-
-
-
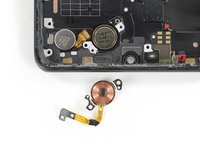
Remember that missing earpiece speaker grille on the front of this phone? That's thanks to Huawei's "Acoustic Display Technology" speaker, which works like a vibration speaker (a.k.a. structure-borne driver).
-
The driving part of this module consists of a coil with a magnet in the middle. It is coupled with the part that vibrates the screen, which is glued to the back of the display.
-
Don't confuse it with the conventional vibration motor for alerts, which is mounted on the metal frame next to it.
-
-
-
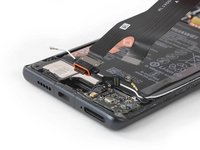
On our way to the fingerprint sensor, we fish out the USB-C port, attached to a long interconnect cable.
-
If you opt to charge wirelessly, the wear-and-tear on this port should be greatly reduced—but when it does fail, it's nice to see that it comes out separately from the daughterboard and SIM card reader.
-
We're all in favor of more major component modularity (or MMCM, as no one calls it). This makes for greatly expedited repairs compared with, say, the soldered ports on the new Galaxy S10 line.
-
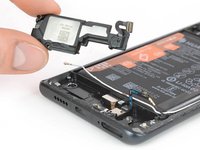
While we're here, we extract the traditional (non-display-based) loudspeaker module.
-
-
-
We finally reach the fingerprint sensor, mounted quite close to the bottom edge of the phone. What is the maximum thumb length here for comfortable unlocking?
-
This fingerprint sensor is the same Goodix GM185 optical scanner as seen in the OnePlus 6T, the Xiaomi Mi 9, and the Vivo Nex S.
-
-
-
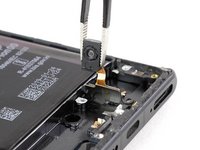
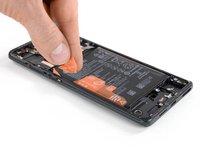
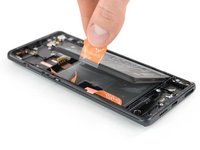
The battery comes with these handy pull tabs, previously seen in the Mate 20 Pro.
-
While the tabs labelled "1" and "2" are somewhat useless (don't mistake them for adhesive pull tabs), number 3 helps us lever the energy cell out of the case.
-
-
-
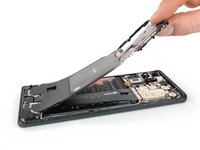
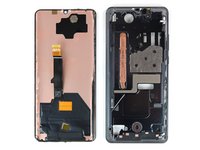
Moving on to the screen, we find the second half of the glass-vibrating earpiece speaker module stuck to the back of the display as we fight through the adhesive.
-
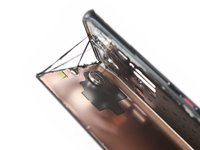
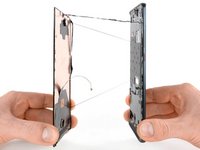
Similar to the back cover, the gap between the frame and the display is virtually non-existent—and the slightly-curved edges of the display don't help, either. We're pretty sure this display is done for after the heat, cutting, and prying it's endured.
-
The strong adhesive strings between the frame and the display fight us like Spider-Man trying to reassemble a boat.
-
-
-
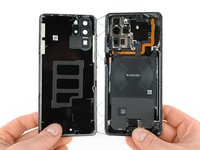
Having finished with the P30 Pro we focus in on the important stuff:
-
A tightly-glued-shut device with the barest sliver of a gap for entry
-
An inside crammed with nifty optical tech like a periscope camera and an in-display fingerprint sensor
-
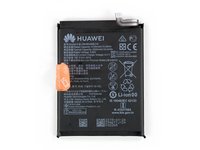
A plus-sized battery with some pull tabs for grappling with the glue
-
And a tall screen with the earpiece speaker glued to its back.
-
Taking everything into account, it is time to zoom in on the score.
-
- A single Phillips driver is all we need to handle the screws.
- Most components are modular and can be replaced independently—except for one half of the earpiece speaker.
- Battery replacement is possible, if you're willing to fight through the glue.
- Heavily glued-down glass both front and back means greater risk of breakage, and makes repairs difficult to start.
- Screen repairs require a lot of disassembly while battling tough adhesive (back, battery and screen).


Final Thoughts
Repairability Score


(10 is easiest to repair)

Team

Tobias Isakeit - Repairability Engineer Member of Tobias Isakeit - Repairability Engineer
Business
1 Member
1,131 Guides authored
39 Comments
Tnx for disassembly explanation. What is under PCB stack?
Is there any chance you will do a overview of the front internals for a wallpaper? I along with other people would be thrilled to have it :)
Orange flex looks like grounding flex. It would be nice to see what is other side of that part.