
What you need

This teardown is not a repair guide. To repair your Oculus Rift S, use our service manual.

  1. Oculus Rift S controller Teardown, Oculus Rift S controller Teardown: step 1, image 1 of 3 Oculus Rift S controller Teardown, Oculus Rift S controller Teardown: step 1, image 2 of 3 Oculus Rift S controller Teardown, Oculus Rift S controller Teardown: step 1, image 3 of 3
    • Remove battery, and the sticker underneath.

    • Picking a corner with a tweezer then grip and turn with the tweezer is a good way to remove the sticker.

    • Remove the two T5 torx screws.

    • Push firmly and turn to avoid slipping and stripping.

  2. Oculus Rift S controller Teardown: step 2, image 1 of 2 Oculus Rift S controller Teardown: step 2, image 2 of 2
    • Using a pry tool, start near the strap and pry away grip portion until it starts to hinge from the top.

    • Carefully pull back and down to remove the grip, clearing the grip trigger's hinge.

  3. Oculus Rift S controller Teardown: step 3, image 1 of 1
    • Remove the two T5 torx screws below the trigger.

    • Remember to apply pressure when removing the screws.

  4. Oculus Rift S controller Teardown: step 4, image 1 of 3 Oculus Rift S controller Teardown: step 4, image 2 of 3 Oculus Rift S controller Teardown: step 4, image 3 of 3
    • Using a straight-edge, wedge the inner ring away from the outer starting at the seam to separate the sensor array. Pull the sensors down carefully.

    • Be careful. The sensors are attached by ribbon cabling and could be easily damaged. The safest pry location is near the seem towards the bottom.

    • While pulling down on the sensors, push the outer ring towards the buttons. A uncomfortable amount of force is required to separate.

  5. Oculus Rift S controller Teardown: step 5, image 1 of 1
    • Insert wisdom here.

  6. Oculus Rift S controller Teardown: step 6, image 1 of 2 Oculus Rift S controller Teardown: step 6, image 2 of 2
    • Remove two T5 torx screws near the trigger to separate the cover for the buttons.

    • Hold the cover down while turning the controller upside down to avoid spilling the buttons.

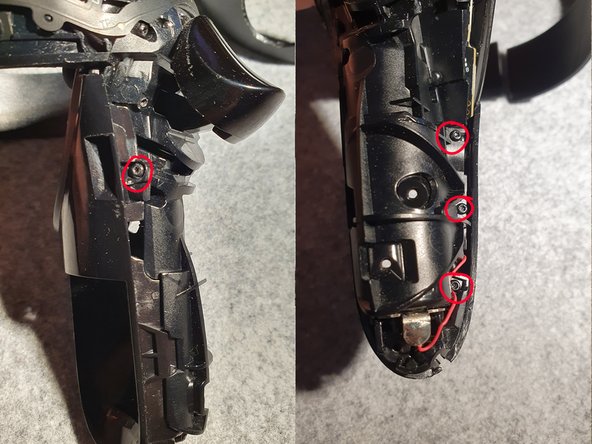
    • Unscrew four T5 torx screws around the controller to separate the bottom PCB. One is facing outwards near the trigger. Three others are opposite from the battery compartment.

  7. Oculus Rift S controller Teardown: step 7, image 1 of 2 Oculus Rift S controller Teardown: step 7, image 2 of 2
    • Lift the wires up, and then remove the handle. Make sure to disconnect the wire or you may sever it.

    • The PCB also serves as the surface for the spring backing the trigger. Re-inserting the PCB with the handle still attached (for instance when cleaning) will require a separate tool to push the spring back while positioning the PCB back into place.

  8. Oculus Rift S controller Teardown: step 8, image 1 of 2 Oculus Rift S controller Teardown: step 8, image 2 of 2
    • Lift the flap to disconnect the circuit board from the body.

    • To disconnect the thumbstick, pull the black bar towards the thumbstick slightly to release the wires. Do not try to lift the 'flap' as isn't one!

Minicoin

Member since: 01/17/21

157 Reputation

1 Guide authored

2 Comments

is there a place to get individual parts for the controller?

Luke Hodges - Reply

Can you use oculus 2 location ring flex cables for these? You can’t seem to find any parts for these controllers anywhere

Leprosy - Reply

Add Comment

View Statistics:

Past 24 Hours: 12

Past 7 Days: 68

Past 30 Days: 105

All Time: 4,144