Introduction
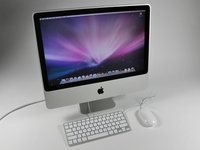
Go to step 1We picked up the new iMac 20" from our local Apple store on March 3rd.


-
-
It's here!
-
We turned it on (only briefly, of course); the LCD display is beautifully clear, even though its resolution (1680x1050) is smaller than the 1920x1200 resolution found in the MacBook Pro 17" Unibody.
-
The speakers are also surprisingly loud and clear, given that the sound seemingly comes out of nowhere...
-
Feel free to comment on specific steps as we go. We'll do our best to accommodate any special requests for pictures.
-
-
-
The ports:
-
Optical digital audio out / in
-
Four USB 2.0 ports
-
FireWire 800, 7 watts
-
Gigabit Ethernet
-
Mini DisplayPort (with support for DVI, dual-link DVI, and VGA)
I wonder if it's possible to add/create an aftermarket frame for the display to cover the screws and leave the matte screen exposed like the new 17" MBP?
One could make some dollars with such an idea.
optical?
Disc drive.!
Sorry in my reply to you but the stupid 12 character minimum for each post is ridicu .
-
-
-
Look at those lovely cords. Yay for cords. Going wireless will add an extra $50 to your iMac's pricetag -- $20 for the mouse and $30 for the keyboard.
-
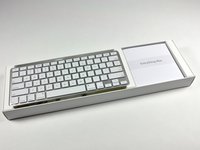
Apple should really have an Aluminum mouse. The included white plastic Mighty Mouse looks like something thrown in as an afterthought.
-
Our keyboard has no number pad, but in their online store Apple offers a "keyboard with numeric keypad" as a no-cost alternative to the standard one.
-
Apple confirmed that nothing from the PC world was used in the creation of this iMac, as evident by the "Everything Mac" slogan.
-
-
-
It has begun.
-
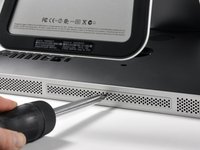
Unscrewing the single exterior screw -- the RAM cover. We brainstorm on what magical wonders may lie underneath...
-
Behold: RAM!
Can it be replaced with 8 GB Ram DDR III 1600
But you have to remove this screw, otherwise the holder will be damaged when rotating the bevel in step 7!
-
-
-
We use only the best parts around here. Our suction cups come straight from Maranello, Italy (in Ferrari red, of course).
Hi im looking how to get an bondo suction cup in the philippines? or any suggestion where i buy it here in the philippines?
-
-
-
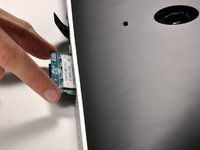
Fourteen magnets hold the front glass panel in place. Our suction cups were very handy for this operation.
-
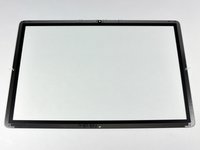
The glass panel comes off with a gentle pull straight up.
-
The rear of the glass has a metallic bezel, as well as seven alignment posts. The magnets that help hold the glass in place are in the iMac's aluminum front bezel.
Quote from mrarteest:
I would love to see the underside of the glass panel.
I added a photo of the underside of the glass panel to this step. The magnets are all attached to the iMac's aluminum front bezel, not the glass. The back of the glass just has a metallic ring around the edge, as well as some alignment posts.
Quote from grovberg:
I'm a little confused. The glass on the front is held solely with magnets? Is that all that's preventing the glass from falling out? Seems like it would slide out accidentally at some point doesn't it?
The glass on the front is held in place by magnets - no screws or adhesive. Of course the aluminum frame around the glass also supports the glass, and the gap tolerance between glass and frame is very small.
Quote from jerryl:
OK, I've got to ask: How did you figure out that you could pull the glass panel off like that? Is this a known construction technique, or did you get a hint from an insider?
It's not generally known, but it's not a huge secret either. There were no screws on the glass so that limited our options to either suction cups or a hammer :)
Suction cups won the roshambo, so we used them instead of the hammer :)
Quote from grovberg:
I'm a little confused. The glass on the front is held solely with magnets? Is that all that's preventing the glass from falling out? Seems like it would slide out accidentally at some point doesn't it?
Earlier this year, while shipping my faulty new iMac back to Apple, UPS must have dropped the (original) box pretty violently. Due to a screw-up (one of many) the box came back to me and I could hear the glass pieces rattling about in the box.
So, yes, it is possible for the glass to be dislodged. I suspect, though, that it would take some force - like dropping the iMac - to knock the glass off.
-
-
-
The display is less glossy now.
-
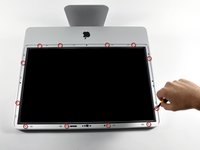
Twelve screws are exposed:
-
Eight 12.8 mm T8 Torx screws.
-
Four 24.6 mm T8 Torx screws.
-
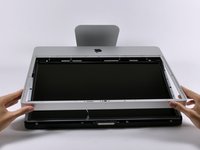
The front bezel then simply rotates up. The microphone cable must be disconnected before the bezel is entirely free.
Hey I wonder if you could show the underside of the front bezel. I would like to see how they attached the magnets and how they built the bezel?
-
-
-
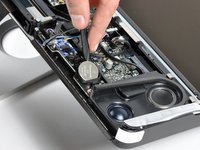
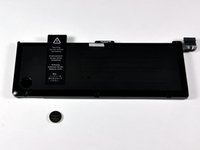
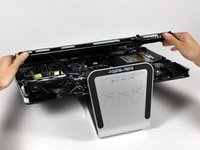
We wanted to see how the iMac clock battery (190 mAh) stacks up with the 17" Unibody's behemoth (12,820 mAh), so we put them next to each other:
-
-
-
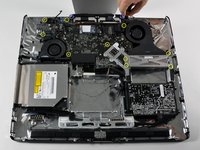
Most components are buried beneath the LCD assembly. This isn't a new design for Intel iMacs, but is certainly not as convenient as the rear-accessible iMac G5.
-
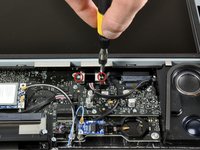
Unscrewing the two T6 screws securing the display data cable.
-
After removing the two screws, we pulled the connector straight up, wiggling back and forth as necessary.
Quote from arbath:
I always wondered if you could utilize just the monitor of an iMac once the machine becomes obsolete. Maybe there is a way to connect to the LCD and plug it into a Mac mini?
You can kinda-sorta do that if the computer still works using the prefpane teleport - it connects via VNC and relays all mousing and keypresses to the other computer. Save for network lag and and the fact that you cannot really move windows between the screen it works like a computer in extended desktop mode. Of course, it also means that the old computer has to run your apps - which has the benefit on the other hand that your main machine won't have to.
-
-
-
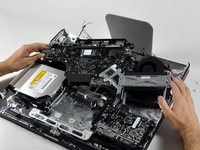
The LCD panel is held in place with eight 11.8mm T8 Torx screws.
-
There are five cables (four inverter cables and one temperature sensor) to disconnect before the LCD panel can be removed from the iMac.
-
This display is an AU Optronics M302EW02. The manufacture date shown on the back of the LCD is 09/04, that's probably the 4th week of 2009.
Quote from HickUp:
I suppose, 09/04 means "4th week of 2009", that's more likely.
Greets, Harry
You're right, good point. I've updated the info on the guide. Thanks for your help.
Quote from HickUp:
I suppose, 09/04 means "4th week of 2009", that's more likely.
Greets, Harry
Dude, not to ruin your game,but it think is is made in the fourth month of 2004. These things are planned for the later generation computers along time before before it comes out for consumer sale. In this case it took Apple 4-5 years to remove the iMac to the masses.
"The LCD panel is held in place with eight 11.8mm T9 Torx screws."
The 2006 model iMac LCDs were held in place with T10 Torx screws. Every model since then has had T8 Torx screws holding the LCD.
Is your T9 Torx driver very well worn, or was that entry really just a typo?
The temperature-sensor cable connection isn’t shown.
This is a teardown/hardware overview, not a repair guide, so a lot of details are skipped. If you’re looking for instructions, see the instructions page.
-
-
-
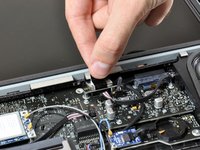
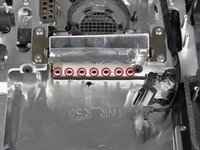
Removing the desktop 320GB SATA hard drive.
-
After disconnecting the temperature sensor cables, we rotated the long black clip toward the drive to unlock it, then swung it to the side.
-
We then unplugged the SATA cables and pulled out the hard drive without removing any additional screws.
Quote from jprokos:
Where does the cable for the SATA drive connect on the logic board. Is there room to attach a card to give us two SATA ports then run a cable out to a drive enclosure?
The SATA power cable is integrated into the bundle of cables leading to the large black connector on the face of the logic board and the SATA data cable connects to the logic board above the left RAM slot, next to the IR sensor.
-
-
-
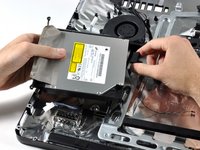
Apple's flat-panel iMacs have always been an interesting cross between a laptop and a desktop. This iMac features a laptop-style optical drive and RAM, but a desktop hard drive.
-
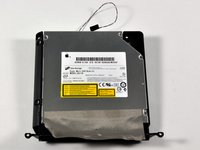
This is a 12.7mm SATA 8x double-layer SuperDrive.
Quote from willhoyt:
Doesn't AppleTV still use a PATA drive?
Good call, I think you're right. I completely forgot about the AppleTV. We haven't opened one recently, but I'm pretty sure they're still using PATA drives in the AppleTV.
Quote from luke:
Good call, I think you're right. I completely forgot about the AppleTV. We haven't opened one recently, but I'm pretty sure they're still using PATA drives in the AppleTV.
Slightly off topic, but I'd love to see an AppleTV guide (hardware AND software) from you guys. I bought a 40gb apple tv about a year ago figuring I could just buy a new hard drive and install it myself. Then I started researching and found out that a. it was a PATA drive and b. required unix command line hacking to do the job. I'm sure your team could put together an easy to follow guide for it.
Now - I need to turn off my late 2008 MBP to replace the hard drive using your guide again - I'm going to a 500gb that I just bought to replace the 320 I put in there about 7 or 8 months ago... Great guides guys...
Quote from willhoyt:
Doesn't AppleTV still use a PATA drive?
I am replacing my optical drive in my early 2008 iMAC desktop (already removed it thanks to your guide), but now am unsure of what replacement to order. How do I know if it is PATA, SATA or otherwise? Probably a dumb question for you guys, but I'm just learning. I know you should be able to tell by the connector. Any help?
The drive says: Model UJ-875 Super 875CA Manufactured: January 2008 Its a Panasonic
Have a look at the connectors if it has a connector with 8 metal bits. exactly 8 it is sata :-p
Quote from MXdaddy:
I am replacing my optical drive in my early 2008 iMAC desktop (already removed it thanks to your guide), but now am unsure of what replacement to order. How do I know if it is PATA, SATA or otherwise? Probably a dumb question for you guys, but I'm just learning. I know you should be able to tell by the connector. Any help?
The drive says: Model UJ-875 Super 875CA Manufactured: January 2008 Its a Panasonic
The optical drive, in my early 2008 24" Imac, is not grabbing discs anymore. I was wondering if you ever found the answer to your question. After some research, I found someone that had the same problem as me and changing out the cable was all that was needed. Does anyone know which cable I need to purchase? Thanks in advance, Shannon
I have the same problem i actually had a CD stuck inside my Imac early 2008 as well and brought it to the genius bar paid $85 dollar for them to take the drive apart and remove the CD from the drive. Now the control arm is stuck in the down position. The drive is constantly trying to read a CD that isn't there and is just making noise all the time. I really need to find out how to purchase a new one. Thanks to the new tear down pics i can do it myself instead of being without a computer for a week and paying $85.
Quote from scgoan:
The optical drive, in my early 2008 24" Imac, is not grabbing discs anymore. I was wondering if you ever found the answer to your question. After some research, I found someone that had the same problem as me and changing out the cable was all that was needed. Does anyone know which cable I need to purchase? Thanks in advance, Shannon
Has anyone had any luck replacing their optical/DVD super drive? After getting a CD stuck, the drive burned out. I've purchased a few drives, all of which didn't grab the CD and pull it in soon enough (I'd have to push the CD into the housing another quarter inch before it's gripped and sucked in).
I purchased a (supposedly) Apple-branded drive from eBay which has been working a little better. But now when I re-attach the screen and its screws, it sandwiches the optical drive, making a loud whirring sound, and too tight to actually get a CD in there.
So it works reasonably well if I could leave the screen off, but once on, no luck. I've tried multiple times and different ways, tightening screws, etc. I've searched and googled and can't find any help...!!!
HELP!!!??? Anyone experience this? Am I doing something wrong, forgetting a screw, something, anything?
Quote from KCSamerica:
Has anyone had any luck replacing their optical/DVD super drive? After getting a CD stuck, the drive burned out. I've purchased a few drives, all of which didn't grab the CD and pull it in soon enough (I'd have to push the CD into the housing another quarter inch before it's gripped and sucked in).
I purchased a (supposedly) Apple-branded drive from eBay which has been working a little better. But now when I re-attach the screen and its screws, it sandwiches the optical drive, making a loud whirring sound, and too tight to actually get a CD in there.
So it works reasonably well if I could leave the screen off, but once on, no luck. I've tried multiple times and different ways, tightening screws, etc. I've searched and googled and can't find any help...!!!
HELP!!!??? Anyone experience this? Am I doing something wrong, forgetting a screw, something, anything?
Hi,
I have just recently replaced the CD/DVD-Superdrive, and experienced the same problem.
Repeating the process, being very carefull when aligning the EFI-tape and the small EFI-"bumper", and the whole unit against the edges of the inside, I then got it right. Alignment with the alu-front is the key thing.
As I also have replaced the internal 320GB harddisc with an 1TB, I´m reasonably "experienced" with the repair process! (Strange that Apple are using so shortlived components?)
My advice is: Use magnetic Torc-screwdrivers, and be very carefull not loosing the small screws down in the case, particulary the screws that supports the data-connector to the LCD panel.
And, many thanks to iFixit for excellent informations and pictures that has saved costly repairs, and had the nice experience of fixing problems on my own!
Regards, Oivind Marman, Oslo, Norway.
Hi cd drive, the nintendo wii uses same size and connections
-
-
-
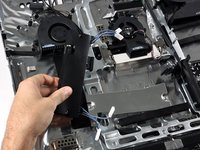
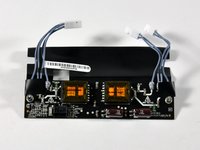
As we mentioned earlier, this iMac still uses an LCD with a CCFL backlight. This particular display features four backlights, each of which require their own high-voltage AC power.
-
All four are powered by a single large inverter.
-
-
-
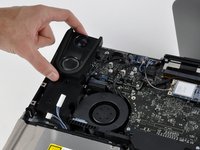
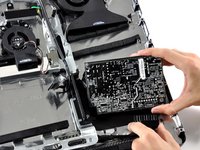
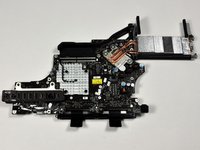
The large and awkward logic board.
-
The ports are all soldered directly to the logic board, and connect at a slight angle to fit the curvature of the iMac's rear housing.
it looks like it still uses an audio daughterboard, so the audio i/o isn't soldered to the logic board...correct?
Quote from invisiboninjo13:
it looks like it still uses an audio daughterboard, so the audio i/o isn't soldered to the logic board...correct?
Yes, that is correct. You can see the separate audio board pretty clearly in removing the right speaker.
The ugliest mac logic board in history in such a tuxedo of a Mac, what a shame. Would it not be more cost effective for them if they just put macbook/pro guts inside of this machine? Designing mother boards has got to be expensive. I mean if my 2006 macbook is 1 inch thick, and I were add it to the back of an LCD, I would be very happy with that. If they have to make brand new computers every 2 years they should consolidate boards.
Quote from TyTy:
Hey, the stand IS NOT that integrated, you jimmy in loss with a credit card and then pull it out to expose the screws, you use this process to VESA mount an iMac.
I'm pretty sure there's no easy way to remove the stand on this 20" iMac. On the 24" iMac, the stand is easy to remove with the procedure you described. We haven't tried this particular product, but imacmount.com appears to offer a VESA mounting solution for iMacs that Apple does not support. I don't know if their existing kit will work with this new iMac, but it looks like it would.
Now, there is still quite a lot of shielding left on the inside of the case.
Is it possible to remove that foil (???), the fans and whatever else is still there?
So that one would be left with only the bare case and the stand with absolutely nothing attached to it.
I want to buy one and then anodize the entire case in deep black or maybe in oceanic blue :)
(Because it will have to match my anodized unibody MacBook Pro, you know :D )
Is it possible to put the logic board from the newest version of iMac into 24" iMac 2.8? I really want to run a dual display using the Apple LED monitor, but i have to way to connect it using the mini-dvi on my logic board. Any suggestions? Any and all help is greatly appreciated.
Quote from mrarteest:
The ugliest mac logic board in history in such a tuxedo of a Mac, what a shame. Would it not be more cost effective for them if they just put macbook/pro guts inside of this machine? Designing mother boards has got to be expensive. I mean if my 2006 macbook is 1 inch thick, and I were add it to the back of an LCD, I would be very happy with that. If they have to make brand new computers every 2 years they should consolidate boards.
Um.. try every 6 months
-
-
-
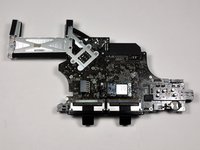
The heat sink directly above the 2.66 GHz Core 2 Duo processor.
-
The processor appears to be socketed, but unfortunately there's a "Warranty void if removed" sticker that must be removed to access it.
any idea what socket type it is? (judging by what's available on newegg, i'd say it's probably socket P)
that info could be useful to anyone who might want to upgrade to the nehalem/calpella chips this summer.
Hmm, I'm curious about the square black chip in the bottom center of this pic. I first noticed it in the high res pic of the back of the logic board. Any idea what it is??
Also, surely you guys are kidding about the warranty sticker thing!! What's really keeping you from removing the heat sink?
the cpu is not soldered on to the board but the gpu is soldered onto board.
-
-
-
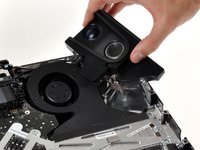
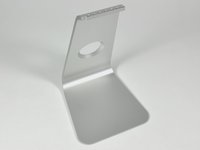
On the 20" iMac the stand is very integrated into the computer. Removing the stand requires you to first remove almost all internal components.
-
The stand is fastened to the housing with 7 T10 Torx screws.
Can the VESA Mount Adapter Kit mounted on the iMac 20" in an easier was?
Quote from Josephcsli:
Can the VESA Mount Adapter Kit be mounted on the iMac 20" in an easier way?
Can anyone let me know the screw sizes for the 4 bolts that hold the stand bracket to the imac back housing. Someone removed the stand in my imac and now I have the stand and the imac but those 4 bolts are missing.
Thanks
It doesn't matter I found the answer myself: M4x7x6mm (Apple part# 922-7020)
me61ic -
-
-
-
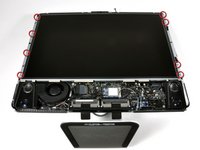
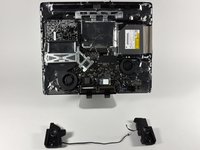
It was a lot prettier when we started.
-
There you have it! Be sure to check back often for more teardowns, guides, and quality parts and tools.
Quote from uberwiess:
Do you guys have any plans to post a guide on how to remove the stand? I'm interested in hanging this guy on a wall in my kitchen.
Apple sells a kit for removing the stand and installing an adaptor for a VESA mount:
Quote from toejam07:
D'oh, that kit is for the 24" model, not the 20"! It actually doesn't look like Apple "officially" supports such a solution for the 20", so I guess iFixit will have to come to the rescue?
The way the chassis is built on the 20" model is completely different from the 24". You would actually need to have someone manufacture a 'foot' that would replace the the current one and just stick out of the back to be mounted to something. Not to forget that if you wanted to change out the foot, you're essentially gutting the whole machine down to the chassis and rear housing.
- B
Quote from uberwiess:
Do you guys have any plans to post a guide on how to remove the stand?
I've added a picture for removing the stand from this iMac. As SupermeBeing said, It's not good news for mounting. There doesn't appear to be any way to remove the stand except from the inside of the iMac, meaning you'd pretty much have to take everything out to remove the stand, as well as come up with a custom mount.
Quote from toejam07:
D'oh, that kit is for the 24" model, not the 20"! It actually doesn't look like Apple "officially" supports such a solution for the 20", so I guess iFixit will have to come to the rescue?
There's a more generic mounting bracket for both sizes at
-


11 Comments
does anyone know if you can upgrade the processor in this model??
yes, but 2007 only with T9300 or T9500
Wonderful teardown! I was able to remove the electronic guts and LCD of a broken aluminum imac thanks to this guide. Now I wonder what to do with an empty Aluminum case with stand. It's too thin for an aquarium. Any ideas?
Hi! Replace the inside with the newest Raspberry Pi! One example: https://www.tomshardware.com/news/raspbe...
Andy -
You can Build an ant farm.
Seth -
What are the internal dimensions of the imac once everything is removed (other than the screen, and anything required for the screen to turn on)
Hello there fellow humans I see you have learned how to take apart my creation no matter my newer model is stronger and better than before you won’t be able to take apart that one hahahahahhahahahaha. Better luck next time.
Get rekt ya bunch of nerds hahahahahhaha
hooman -
Ooga booga just use big rock
Seth -