
MacBook Pro 15" Retina Display Late 2013 Speakers Replacement
Introduction
Go to step 1The left and right speakers are paired together in the MacBook Pro with Retina display. Therefore, they should be replaced as a pair. Use this guide to replace both speakers in your MacBook Pro 15" Retina Display Late 2013.
What you need


-
-
Remove the following P5 pentalobe screws securing the lower case to the MacBook Pro:
-
Eight 3.0 mm
-
Two 2.3 mm
-
-
Tool used on this step:Tweezers$4.99
-
Use a spudger or tweezers to pry the three AirPort antenna cables straight up off of their sockets on the AirPort board.
-
-
-
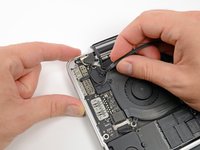
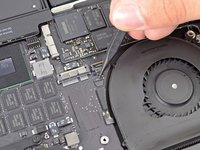
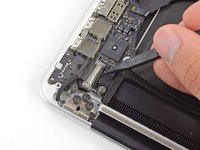
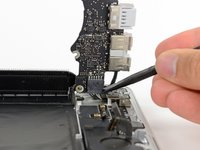
Using the flat end of a spudger, pry the I/O Board connector straight up out of its socket on the logic board.
-
In a similar fashion, remove the I/O Board cable connector from its socket on the I/O Board.
-
Remove the I/O Board cable from the MacBook Pro.
-
-
-
Remove the single 2.9 mm T5 Torx screw securing the AirPort card to the logic board.
-
-
-
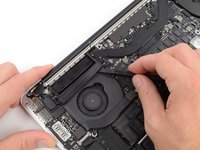
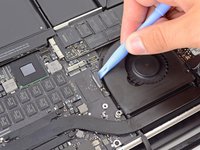
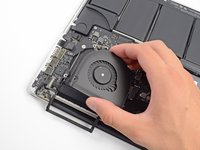
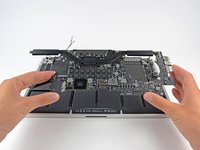
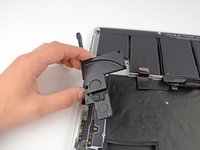
Use the flat end of a spudger to lift the rubber heat sink cover up off the left fan.
-
-
-
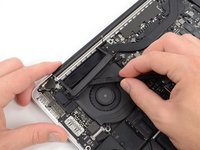
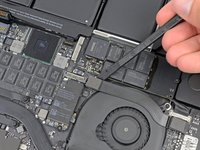
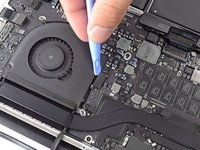
Use the tip of a spudger to flip up the I/O board data cable lock and rotate it toward the battery side of the computer.
-
Use the flat end of a spudger to slide the I/O board data cable straight out of its socket on the logic board.
-
-
-
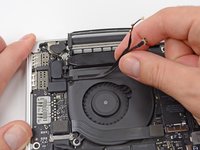
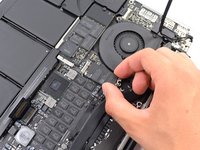
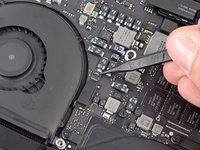
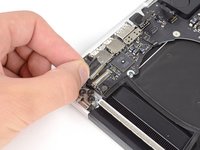
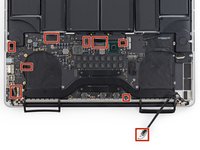
Use the flat end of a spudger to pry the left speaker connector up and out of its socket on the logic board.
-
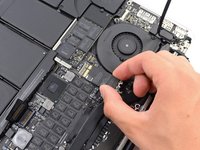
Use the tip of a spudger to pry the right speaker connector up and out of its socket on the logic board
-
-
-
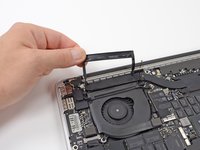
Peel back the tape covering the top of the keyboard ribbon cable connector.
-
Use the flat end of a spudger to flip up the retaining flap on the keyboard ribbon cable ZIF socket.
-
Use the flat end of a spudger to push the keyboard ribbon cable out of its socket.
-
-
-
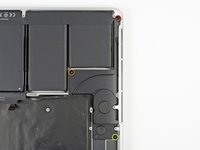
Remove the following three screws securing the left speaker to the upper case:
-
One 5.6 mm T5 Torx screw
-
One 6.9 mm T5 Torx screw
-
One 2.6 mm T5 Torx screw
-
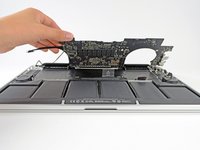
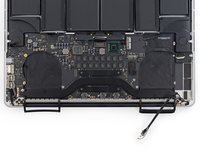
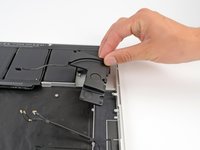
Lift the left speaker out of the upper case and set it aside.
-


To reassemble your device, follow these instructions in reverse order.
To reassemble your device, follow these instructions in reverse order.
Cancel: I did not complete this guide.
58 other people completed this guide.

26 Comments
Where does the wire of the right speaker go?
look on this step 22
MacBook Pro 15" Retina Display Late 2013 Speakers Replacement
Didn’t replace my speakers but had to remove them to clean the speaker grill area due to debris. This was a good spill as it allowed me the opportunity to nearly disassemble and gain a better understanding and appreciation of my beloved Macbook. I’ve never been inside a Macbook and from a technicians’ viewpoint I found the guide(s) here to be excellent, specific task assistants. It’s good knowing the machine is lint, dust, and pet hair free, cooler, with better thermal paste, and threw in a new battery while the egg was cracked. Sincere thanks to you folks at iFixit for doing such a great job. On that note, I had purchased a battery on ebay at a slight savings over your own and I regret this. Had I known I would have been relying so heavily upon your efforts I would have certainly made my purchase from you. The future will find me correcting that error. I imagine your parts are every bit as good as your advice. Thanks again!
Hello just dropping by to say that I really appreciate what the Ifixit team has done here! Beautifully executed walkthrough with more than enough information to successfully make your repair AS WELL as a lovely starter kit for electronics. The hype is real and well deserved! Thanks again!
I had 2 times, successfully replaced, left and right my speaker macbook pro retina Thankyou ifixit..