Introduction
If this switch does not work properly, the machine will permanently indicate a missing drip tray. Replacing the Cherry D44X switch is quite simple.
These instructions may also help with other Melitta models and with coffee makers from Nivona, Siemens, and Miele—they have a very similar design.
Note: it is also possible that only the carrier plate of the microswitch is no longer properly engaged. Tilt the machine so that you can see the base plate. See if the carrier plate is clamped with two catches. If not, open the machine and press the switch firmly until it locks into place. It may have to be replaced.
What you need
-
-
Remove the water tank and drainage tray.
-
Remove the side cover and remove the brewing unit.
-
Remove all coffee beans.
-
-
-
-
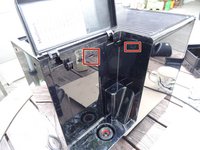
Press carefully into the slits on the sides using a minus screwdriver or a flat metal spatula, to release the clasps on the upper surface. These may be well tight and you have to use some force.
-
You should have created a separation between the upper surface and side panels. Now lever the upper covering away using a plastic tool. This may be quite stuck and you may apply some force.
-
-
-
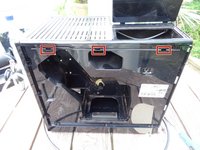
Place a plastic tool in the crack between front panel and left side panel and widen it. Then push the side panel to the back. The side panel will be quite stuck and you may apply some force to do this.
-
Remove the hose from the water tank to the pump.
-
Remove the side panel.
Hi, I have a Melitta Caffeo Solo E950 and had a problem with the switch (it said that the drainage tray was always in while I removed it).
I was able to access the switch right after the step 4 behind the side panel.
Paul
Do you mean this one: Melitta Caffeo Solo microswitch on the drip tray replacement?
VauWeh -
-
-
-
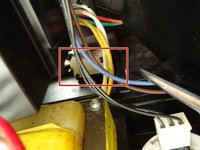
The micro switch is a little bit hidden behind cables. It is held by latches.
-
Push the cables aside, loosen the catches with a metal spudger and take the switch out.
-
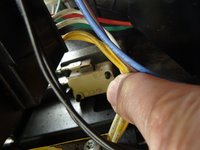
Note how the cables are connected, disconnect the flat plugs and replace the switch.
-


Follow the the steps in reverse order to reassemble your device.
Follow the the steps in reverse order to reassemble your device.
Cancel: I did not complete this guide.
6 other people completed this guide.
Special thanks to these translators:
100%

These translators are helping us fix the world! Want to contribute?
Start translating ›
Team

Repair is War on Entropy Member of Repair is War on Entropy
Community
29 Members
1,752 Guides authored
7 Comments
bei meiner Maschine muss ich die Schale 3-4 mal rausnehmen / einsetzten damit sich das Signal von „dauerhaft an“ auf „blinkend“ einstellt, deutet das daraufhin das der mikroschalter getauscht werden sollte. Übrigens, danke für das tolle Tutorial ..lg Tom bei meiner Maschine muss ich die Schale 3-4 mal rausnehmen / einsetzten damit sich das Signal von „dauerhaft an“ auf „blinkend“ einstellt, deutet das daraufhin das der mikroschalter getauscht werden sollte. Übrigens, danke für das tolle Tutorial ..lg Tom
Hello, I tried to replace the dip tray switch. It seems to work now, but I think I reassembled it back wrongly.
Now, after coffee is grinded, it falls down to a dip tray directly, also, water is being sucked but no hose is filled with coffee and nothing comes out. The main heating unit is super hot but does not provide coffee or water further.
Any idea what can be causing that? All places stick and fit back together.
All water hoses are attached, the only thing I did was to remove two cables from the dip tray switch and I put them back, it seems to work well.
Follow the way of the water, somewhere it seems to be clogged. Pull off the hose on the pump and try to get some water (Caution!!). Does it flow? Pull off the hose on other side of the heater and blow into it - does the air get through? Same procedure for the flowmeter. Good luck!
VauWeh -
Thanks a lot for a quick reply. I’m on a verge of giving up here, but I’ll try out your tips! Thanks big time for giving me hope
Hello, both questions I can answer “yes, all ok”
But I’m not sure where is flow meter, which part is it?
When I try to make a coffee now, the heater unit gets very hot, there is a hot air blowing around it, and no water is coming out further.
It worked all well before I attempted to replace the dip tray switch, I don’t think I touched any cables or did anything wrong (but most likely I did).
Tried my best but I’m stuck now.
Anyway, thanks a lot for help!
Pull off the hose on the pump and try to get some water (Caution!!). Does it flow? Pull off the hose on other side of the heater and blow into it - does the air get through?
Super tutorial Thankx. Offcourse I forgot to mark the wires so I have no idea wich of the two goes where on the microswitch. I Think it doesn't matter. Am I right?
I found that the switch was faulty because connecting the wires got the machine operating again. Tomorrow I get a new switch. regards Andre
bei meiner Maschine muss ich die Schale 3-4 mal rausnehmen / einsetzten damit sich das Signal von „dauerhaft an“ auf „blinkend“ einstellt, deutet das daraufhin das der mikroschalter getauscht werden sollte. Übrigens, danke für das tolle Tutorial ..lg Tom
Hans-A Shole - Reply
Problem ist behoben, Schalter getauscht, Position des Schalters ist bei der Caffeo Solo 950 sehr gut erreichbar. Alter Schalter konnte auch wieder gangfähig gemacht werden und dient nun als Ersatz.
Hans-A Shole - Reply