
Sony Xperia Z3 Compact Battery Replacement

Introduction
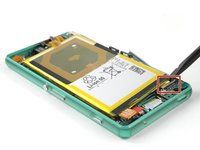
Go to step 1This guide shows you how to replace the battery in your Sony Xperia Z3 compact.
Follow this guide in reverse order to reassemble the device and apply new adhesive where needed.


-
-
Heat the back cover of your Xperia Z3 Compact with an iOpener to loosen the adhesive underneath.
-
Lift up the back cover with a suction handle and put an opening pick in the gap.
-
Move the pick carefully around the edges to loosen the adhesive on every side of the phone.
-
Now you can pull up the back cover with the suction handle.
-


To reassemble your device, follow these instructions in reverse order.
To reassemble your device, follow these instructions in reverse order.
Cancel: I did not complete this guide.
24 other people completed this guide.

Team

Tobias Isakeit - Repairability Engineer Member of Tobias Isakeit - Repairability Engineer
Business
1 Member
1,131 Guides authored
10 Comments
Thank you for repairing your phone and giving it a second chance.
:)
The guide doesn’t mention that one needs new adhesive for the battery (the one I bought isn’t sold with it). It would therefore be wise to mention what kind of adhesive (two-sided, what thckness, etc.)
Double sided tape is enough to keep it in place, as the back cover and midframe holds everything down for extra reinforcement. Sony sure makes their smartphones !&&* to repair, but that’s another rant.