Sony Xperia Z3 Compact Battery Replacement
Introduction
Go to step 1This guide shows you how to replace the battery in your Sony Xperia Z3 compact.
Follow this guide in reverse order to reassemble the device and apply new adhesive where needed.
-
-
Heat the back cover of your Xperia Z3 Compact with an iOpener to loosen the adhesive underneath.
-
Lift up the back cover with a suction handle and put an opening pick in the gap.
-
Move the pick carefully around the edges to loosen the adhesive on every side of the phone.
-
Now you can pull up the back cover with the suction handle.
-
-
-
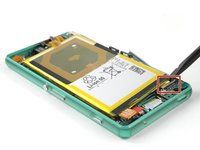
Unscrew the following screws which hold down the mid frame of the Sony Xperia Z3 Compact.
-
Two 2.7 mm Phillips #000
-
Three 2.5 mm Phillips #000
-
Use a Spudger to lift up the mid frame on each side.
Silver screws (2) belong to the side of the frame. Golden screws (3) for top and bottom.
-
To reassemble your device, follow these instructions in reverse order.
To reassemble your device, follow these instructions in reverse order.
Cancel: I did not complete this guide.
24 other people completed this guide.
10 Guide Comments
Thank you for repairing your phone and giving it a second chance.
:)
The guide doesn’t mention that one needs new adhesive for the battery (the one I bought isn’t sold with it). It would therefore be wise to mention what kind of adhesive (two-sided, what thckness, etc.)
Double sided tape is enough to keep it in place, as the back cover and midframe holds everything down for extra reinforcement. Sony sure makes their smartphones !&&* to repair, but that’s another rant.
Nice tutorial, thanks.
CAVE: I broke off one of the connectors to the magnet-charger contacts on the very edge of the mainboard when lifting it off the case. The same seems to have happened to the author (Step 8 and 9 - the lower one of the two black bridges looks rather wonky)
Pitfall: When lifting the vibration motor (Step 7), make sure you check the cable running on the underside of the mainboard afterwards. It is the connector to the on/off switch. If you unplug it accidentially (like I did), you won’t be able to turn your phone back on after the work is done.
Thank you for the precise guide, I’ve followed it with no major problems and no damage done :)
Just a friendly notice to others that will try this, reversing steps order is not enough to reassemble the phone if you’re not careful. Some parts are tricky such as the need to put LCD tape back through motherboard hole or the need to watch out not to destroy jack/sensor tape when pushing motherboard back. Also, you’ll need a double sided tape to glue the battery back to the motherboard - original tapes are destroyed during disassembly. The camera clamp is tricky to remove without bending it. Also, it seems that it’s only kept in place by back plate pressure. Also, remember or take a picture of how the NFC connector is attached - I’ve had problems figuring it out when reassembling.
All in all, great guide and my phone will work for me for months or even years instead of going to a trash can because of a swollen battery. Thanks again!
Took a couple hours but I couldn’t have done it without this guide, thanks! Lets hope the new battery won’t be dying on me by lunchtime every day :)
After replacing the battery and turning on the telephone my Xperia doesn’t see the SIM card.
I did everything very carefully and I don’t know what can be the reason for that.
It’s not like there’s no service, it just can’t read any other SIM card too.
Does anyone have an idea how to fix it?
Amazing - with Carbon Rom this phone is still a daily driver and the old battery needed replacement due to gases expanding the body. I used a bit of sugru for the adhesive parts, especially the back cover. Although it is not waterproof anymore I am really happy that I could repair it with your guide. Much appreciated!


