
La Pavoni Espresso Plus Dissassembly
Introduction
Go to step 1The disassembly of the La Pavoni Espresso plus is shown here. The interior is similar to the Saeco Magic Saeco Cappuccino Magic, and other devices.
What you need
Tools


Show more…
-
-
Unplug the machine from any power source(s).
-
Remove the water tank.
-
The cover is held in place with two Phillips screws (PH1). Loosen the screws and remove the cover.
-
-
-
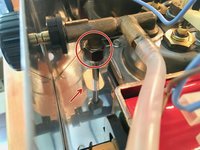
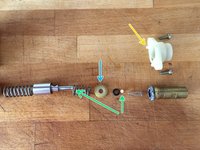
Loosen the grub screw on the stopper (black plastic part) with a 2mm Allen key.
-
Pull stopper over to the side of the machine.
-
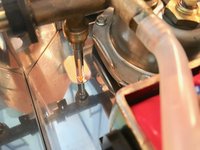
Unscrew the steam valve. The plastic toggle can remain attached.
-
-
-
If necessary, clean the steam valve with descaler.
-
If there is a leak, the two O-rings must be replaced.
Kannst Du bitte die Grösse und das Material der Dichtungen noch Deiner Anleitung hinzufügen.
-
-
-
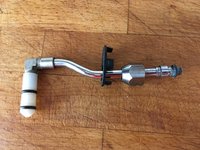
Push the black plastic cover down and out of the bottom of the case. Then, unscrew the union nut (wrench size 13).
-
Pull the steam pipe down and out of the housing.
-
Once you have dismantled the steam pipe, you may choose to decalcify it and replace the O-rings if there are any leaks.
-
-
-
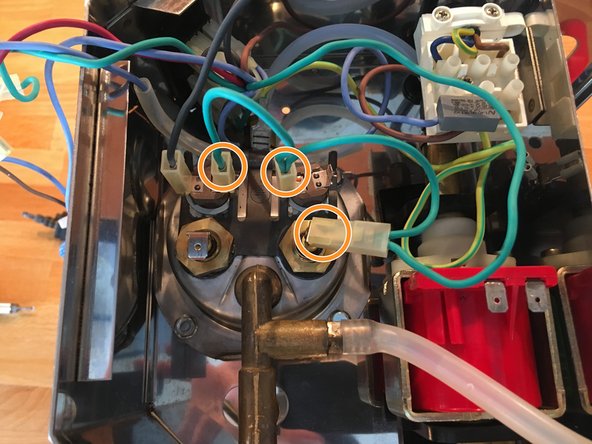
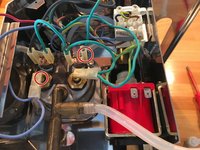
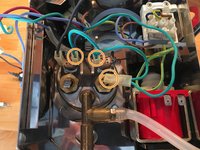
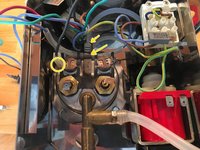
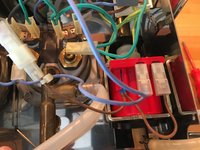
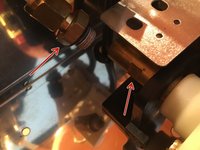
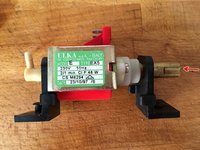
Disconnect the left connection of the heating coil (blue) and the right connection of the right thermal switch (single green wire).
-
Now disconnect the second green cable. It connects the heating coil to the right thermal switch on the left connector and the left thermal switch on the right connector.
-
Disconnect the black wire at the left thermal switch and the green/yellow wire at the ground point. Pull out the temperature fuse (in the transparent plastic tube) under the ground point. To do this, lift the tab slightly.
-
-
-
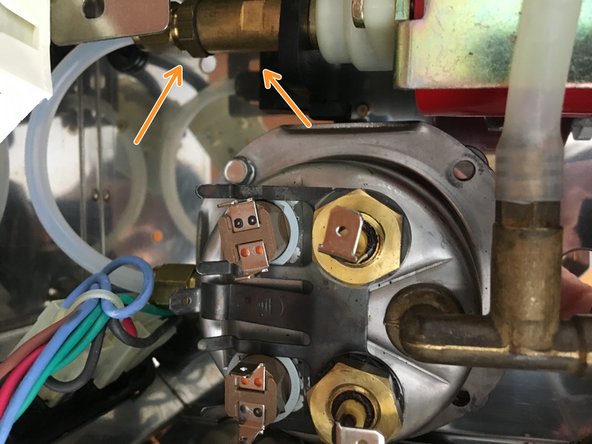
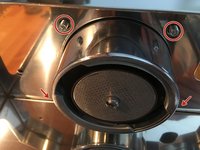
Unscrew the four cap nuts (8mm nuts) on the portafilter holder.
-
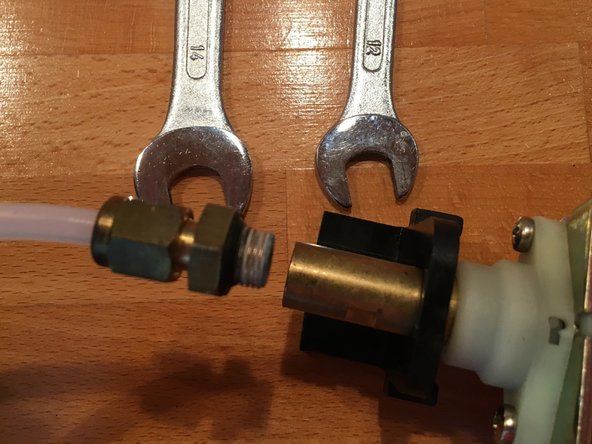
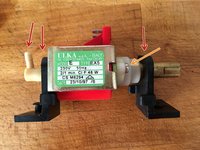
Unscrew the pressurized water line at the pump. Two wrench sizes (SW12 and SW14) are required for this. SW12 is used to hold the pump, and SW14 is used for the union nut. Then, detach the pressure hose.
-
Take a detailed photo of the connection(s) for reference
-
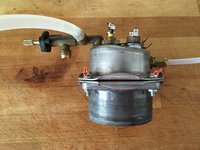
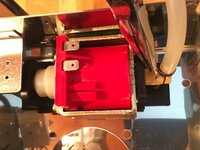
You can now remove the brew-group completely out of the machine.
-
-
-
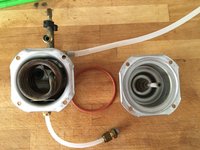
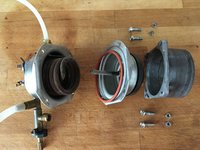
Pull the two halves of the kettle apart. If they are calcified and sticky, tapping them lightly will help.
-
You now have an interior view of the boiler. The limescale usually collects at the bottom of the boiler. Replace the O-ring if it is brittle or leaking. The heating coil and its two seals can also be replaced at this point.
-
Overview of the brewing group: Boiler and portafilter holder.
-
-
-
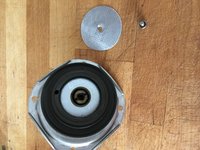
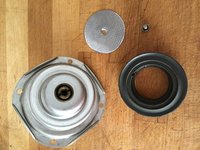
The shower screen is attached with a small slotted screw.
-
The portafilter seal can now be pulled out.
-
At this point, take the opportunity to clean all components thoroughly.
-
-
-
Unplug cable.
-
Pull off the hose to the water tank, by first loosening the clip with pliers.
-
Disconnect the pressure hose. Use size 14 on the union nut and size 12 to hold the pump in place (the electric terminal was clipped off the holder for the photo).
-
-
-
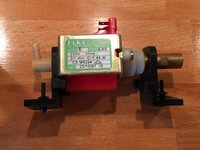
Open the fastening nipple from below, use a 2mm punch or wire and press the mandrel out of the nipple. The pump can now be lifted out of the machine.
-
Take a detailed photo(s) of the removed pump and the mounting nipples.
-
The rubber mounts of the pump can now be easily removed; the rubber connector on the left must also be removed to do this.
-
-
-
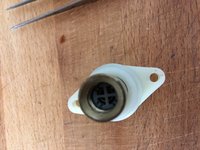
The valve is located at the connection for the pressure hose on the left-hand side.
-
Top view (excluding the rest of the pump): Use pointed tweezers to open and unscrew the black plastic (right-hand thread).
-
The disassembled valve: If necessary, replace the spring and the rubber mushroom if the pump is leaking at this point. Sometimes the valve is also stuck, then cleaning helps.
-
To re-assemble, simply push on the plastic grid as far as it will go.
-
-
-
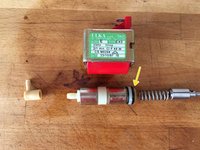
Before disassembling the pump, pull off the rubber holders and the rubber nozzle.
-
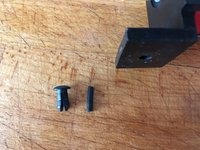
Unscrew the two screws (PH1). The pump can now be pulled out of the coil housing (red plastic housing).
-
The pump is held together by a bayonet lock.
-
Check all springs for breaks and rubber for cracks. If the small plastic ball has become too small and falls into the tube, it must be replaced.
-
The O-ring likes to harden and then no longer seals. 5x2 is the dimension.
-


Follow the steps in reverse order to reassemble your machine.
BEFORE switching on, the suction hose can be filled with water to relieve any strain on the pump.
Follow the steps in reverse order to reassemble your machine.
BEFORE switching on, the suction hose can be filled with water to relieve any strain on the pump.
Cancel: I did not complete this guide.
2 other people completed this guide.
Special thanks to these translators:
100%

These translators are helping us fix the world! Want to contribute?
Start translating ›
17 Comments
Hallo aus der Brühgruppe ist mir beim Ausbauen ein kleines Teil herausgefallen ( Ein Stift mit einem kleinem weißem Ring). Nun weiß ich nicht wo er herkommt.. ich schätze aus einem der zuläufe? Irgendeine Idee?
Ps: Ich habe auch kleinen weißen Schlauch gelöst
Liebe Silke,
danke für deine Anleitung. Ich hänge weiterhin an meiner Espresso Plus. Das tropfende Milchventil scheint ja allseits bekannt. Aber ich weiß nicht, was ich tun kann, um es möglichst gering zu halten. Ich hatte die Maschine nun jährlich zur Überholung abgegeben. Das wird aber immer teurer (weil es eigentlich nicht mehr gemacht wird) und gefühlt werden die Abstände immer kürzer, dass das Tropfen aus dem Milchventil beim Kaffeebezug wieder in einen Fluss verwandelt. Entkalken tu ich alle paar Monate und insgesamt wirkt sie aber auch nirgendwo sichtlich verkalkt. Ich kenne zwar das Spiel mit Aufschrauben, Ventil fester zudrehen etc. und musste dabei aber lernen, dass es ein "zu viel drehen" auf jeden Fall gibt und das Ventil das nicht verträgt. Die O-Ringe sehen m.E.n. gut aus. Und ich weiß nicht weiter. Ich will ungern in eine neue Maschine investieren, auch wenn mit z.B. einer Rancilio der Barista-Schaum besser gelingt. Trotz unkonventioneller Mengen- und Bezugszeit schmeckt der Cappuccino. LG Lisa
Hi,
ich hatte wenig Probleme mit dem Ventil. Wenn du das ausgebaute Ventil entkalkt hast und vor dem Einbau auch das Gegenstück (also das Rohr wo es eingeschraubt wird) mal innen sauber gemacht hast, könnte noch ein wenig Silikonfett helfen. Damit die beiden O-Ringe dünn einstreichen. Silikonfett gibt es im Sanitärhandel in großen Tuben als Gleitmittel für O-Ringe im Trinkwasserbereich, oder in kleinen Tuben im Internet, speziell für Kaffeemaschinen.
Die O-Ringe sehen eigentlich immer gut aus, allerdings werden sie mit der Zeit hart und dichten nicht mehr so gut ab. Falls sie also schon einige Jahre alt sind, müsste ein Tausch helfen.
Viel Erfolg
Silke -
Das is der Ventilstift des Dampventils. Sprich kommt ins dampfrohr, danach der ventilregler. Musst nur schauen das die graue plastikdichtung am Stift heile bleibt
Kurze Frage: wie hast du den Anschlag des Dampfwegs eingestellt? Bei mir is die Dichtung der Ventilnadel kaputt gegangen beim Einbau kaputtgegangen (Ventil vermutlich zu weit zugedreht.)
Nach langer Suche konnte ich neue organisieren, warte nur auf Lieferung. Mein Plan war es, das Ventil offen zu lassen, dampfen zu lassen, dann zudrehen. Sobald kein Dampf mehr rauskommt den anschlag einstellen.
Hallo Till, du meinst das Ventil aus Schritt drei? Das habe ich von Hand ohne den Konststoffknebel zu gedreht (nicht übermässig fest im kalten Zustand) und dann den schwarzen Kunststoffanschlag mit der Madenschraube passend festgeschraubt. Beim anschließenden Test der Maschine war es dann auch dicht. Aber deine Methode klingt auch gut.
Hallo, meine Espresso Plus lusso hat noch einen dritten Thermoschalter zwischen den beiden auf eurem Bild und der scheint defekt zu sein...habt ihr einen Tip wo ich ein solches Ersatzteil bekommen könnte?
Das sind eigentlich Standardteile. Die Schalttemperatur sollte aufgedruckt sein. Dieser Händler hat viele.
VauWeh -
Hallo Zusammen, weiss jemand wo man für die Maschine noch Ersatzteile bekommt. Ich bräuchte den Kunststoffadapter auf der Dampfdüse für den Milchaufschäumer....
Vielen Dank, Thomas
Hi,ich habe Probleme mit Grüne Knöpfe der Temperatur zeigt,wahrscheinlich sensor ist kaput,weissen Sie vho kann ich eine neue kaufen.
Hallo Silke, danke für die tolle Anleitung! Ich habe jetzt das Problem des Wasseraustritts am Pumpenausgang, Schlauch zur Brühgruppe. Kann mir jemand sagen welche Abmessungen der originale O-Ring zwischen den Messingverschaubungen hat? Kann ich am Rest des Originals nur Raten.
Leider nein. Ich würde es ausmessen. Innendurchmesser des Orings entspricht etwas weniger als dem dem Außendurchmesser auf dem er aufgesteckt, für den Außendurchmesser des Orings, den Innenduchmesser des Messingteils messen. Gleiches gilt für die Dicke. Und dann mal schaue was der Händler so einigermassen passendes hat. Ich bestelle meist mehrere in leicht unterschiedlichen Größen, sie sind meist sehr günstig im Gegensatz zum Versand. Wenn du eine passende Größe gefunden hast, dann gerne hier ein schreiben. Viel Erfolg.
Hallo Silke, vielen Dank für die Super-Anleitung. Bei mir tropft das Dampfventil Ich würde es erstmal mit neuen I-Ringen ausprobieren. Wo kann man die beziehen?
VG Katja
Hallo Katja, ich habe meine Ersatzteile beim Reparaturbetrieb in der Nachbarschaft gekauft. Es gibt auch diverse Onlinehändler, aber ich weiß nicht welcher davon gerade die fehlenden Teile liefern kann. Da hilft dir leider nur die Suche im Netz. Stichworte z.B. la Pavoni O-Ringe Dampfventil. Wenn du die Größe selber ausmisst, kannst du natürlich auch bei diversen Händlern für O-Ringe bestellen. Ich weiß die Größe leider nicht und kann auch nicht nachmessen, da meine Maschine zusammengebaut ist. Ich würde Silikon oder EPDM nehmen. VG Silke
Silke -