This user hasn't filled out their profile yet.
My Favorite Guides


Completed Guides


Page 1 of 3
Answers
Guide Comments
This is one of the most beautiful phones I’ve had. Back in the day it had a great feature set for a very reasonable price. Too bad it wasn’t particularly repair-friendly. I broke my LCD by chipping a corner while trying to fix a bad flex ribbon. That was a quick, unfortunate way to turn a $15 problem into a $60 problem lol.
I see the regular M2 has a large identification sticker. On the M2 Aqua (or at least the one I have) the sticker is shorter, so it’s pretty easy to short out the battery flex contacts against the metal shield located just above the battery connector on the motherboard. Once shorted, the battery seems to go into some sort of “protection mode” and the phone wont boot unless you plug it into a charger first.
For anyone doing this on an Xperia M2 Aqua: BE VERY CAREFUL! There’s strong adhesive foam around the microphone (which points forwards and sits under the screen on the Aqua, unlike the regular M2 where it points downwards). Try your best to detach the loudspeaker module from the mic/vibra/antenna PCB first, then very, VERY carefully pry under the PCB with a plastic tool in order to release the adhesive. If you try to remove the whole assembly by lifting from a corner and pulling it sideways, you WILL break the main microphone. Why they’d put such a delicate component in an accident-prone spot is beyond me. Don’t get me wrong, it’s not an expensive fix, but the inconvenience will get on your nerves haha.
I just got done replacing an LCD + Frame on an Xperia M2 Aqua. This phone is needlessly difficult to repair, more so than the regular M2 because there’s surprise adhesive foam everywhere, which led me to accidentally break the main microphone while removing the main speaker/vibrator/mic assembly. Because it’s such an unpopular model, there are not many repair guides on the internet (and the ones I found failed to address this specific part), not to mention how hard it is to find reasonably-priced spare parts. I really hope a mic from a donor phone and a bit of time with a microsoldering station can fix it because I’ve already spent more than the phone is worth in repairs and time haha.
Removing the motherboard is unnecessarily difficult on this model! Why make it like this? One would figure the screws would do a good enough job of securing it to the frame. I guess having to wiggle it out is just part of the fun, right?
Also, getting parts for this model (and it’s water-resistant twin) sucks. I’m currently in the market for a display+touch assembly and it seems I’ll have to resort to importing from AliExpress.
Any idea of how tall the drive is? Is it 12.7mm or 9.5mm tall?
The amount of work required to replace the display assembly is crazy, considering how often these glass screens break. I’d even go as far as to say this model was designed to be tossed into the trash when broken.
I can confirm that removing this without dealing some sort of cosmetic damage is near impossible. Quite a snug fit!
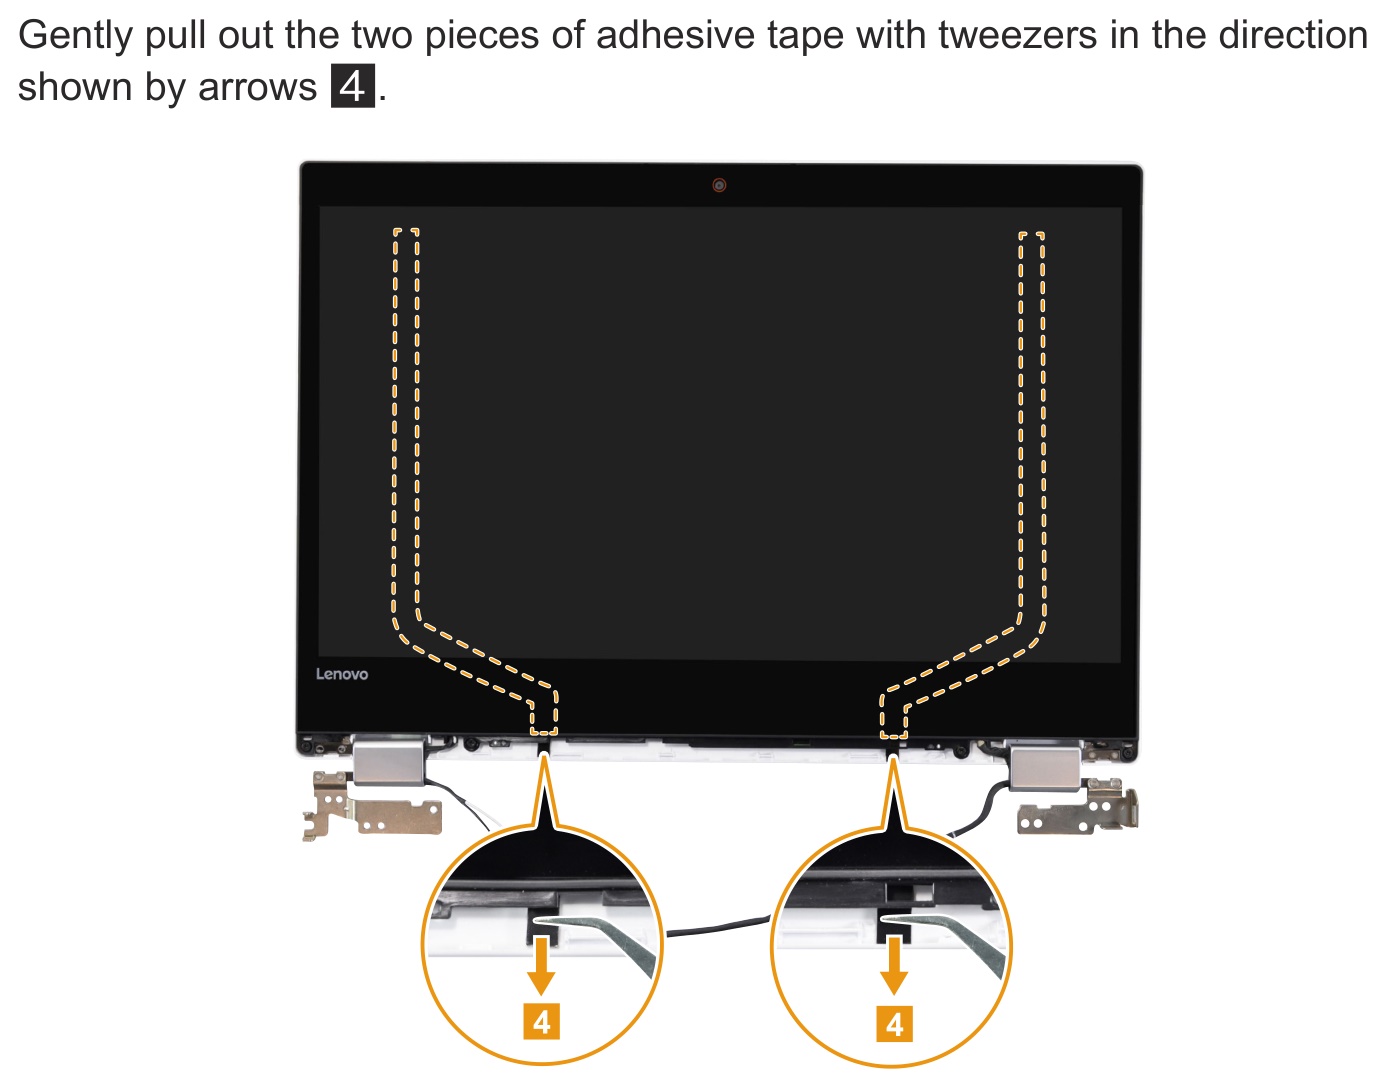
As stated on page 53 of the official Hardware Maintenance Manual, in order to remove the display, you’re better off using the pull tabs in order to remove the pull-to-release double-sided adhesive. Sure, the adhesive will be ruined once pulled away and you’ll need to provide your own double-sided tape when putting it all back together.
- Link to the manual: https://download.lenovo.com/consumer/mob...
- Screenshot of the relevant illustration: https://pixelware.com.bo/uploads/lenovo_...
I wouldn’t risk breaking an expensive display panel just to be able to reuse a couple of (potentially single-use) adhesive strips.
Has anyone tried a cross-generational motherboard upgrade? I have a dead i5-7200u motherboard and found an i5-8250u model on ebay for pretty cheap. The board layout, cutouts and ports look all the same to me.
Page 1 of 2
Luis Alejandro Araúz
@pixelado
55
Reputation
2
Solutions
0
Guides
Member Since 03/02/20